
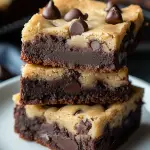


If you love the creamy decadence of cheesecake and the crisp, caramelized top of classic crème brûlée, then these Mini Crème Brûlée Cheesecakes are going to steal your heart. They combine two timeless desserts into one delightful, single-serve treat. Perfect for a dinner party, date night, or even just a special weekend baking project, these mini cheesecakes will wow your tastebuds with their luscious texture and that signature brûléed crunch.
I still remember the first time I tried a proper crème brûlée — the sound of the spoon cracking through that golden sugar top was pure magic. And don’t even get me started on my love for cheesecake, with its smooth, creamy bite. These mini cheesecakes combine the best of both worlds, and they’re so easy to make at home that you’ll wonder why you haven’t tried them sooner.
Why You’ll Love These Mini Crème Brûlée Cheesecakes
- Perfect single-serving portions
- Rich, creamy, and indulgent
- A crisp caramelized sugar crust for that iconic brûlée crack
- Simple pantry ingredients
- Impressive yet beginner-friendly
- Make-ahead for effortless entertaining

Ingredients
For the Crust:
- 1 cup graham cracker crumbs (use gluten-free if needed)
- 3 tablespoons melted butter
- 2 tablespoons granulated sugar
For the Cheesecake Filling:
- 16 oz cream cheese, softened
- ½ cup granulated sugar
- 2 large eggs
- 1 teaspoon vanilla extract
- ¼ cup heavy cream
For the Brûlée Topping:
- ¼ cup granulated sugar
How to Make Mini Crème Brûlée Cheesecakes
Step 1: Prep and Preheat
Preheat your oven to 325°F (163°C). Line a 12-cup muffin tin with cupcake liners — this makes removal and serving much easier.
Step 2: Make the Crust
In a bowl, combine the graham cracker crumbs, melted butter, and 2 tablespoons of sugar. Mix until the texture resembles wet sand. Press about a tablespoon of this mixture firmly into the bottom of each cupcake liner.
Bake for 5 minutes, just until set, then set aside to cool slightly.
Step 3: Prepare the Cheesecake Filling
In a large bowl, beat the softened cream cheese and ½ cup sugar until smooth and creamy. Add the eggs one at a time, beating well after each addition. Mix in the vanilla extract and heavy cream, beating until smooth and silky.
Step 4: Fill and Bake
Spoon the cheesecake filling evenly over the prepared crusts, filling each liner about three-quarters full.
Bake for 18–20 minutes, or until the centers are just set but still slightly jiggly. Remove from the oven and let cool to room temperature before transferring to the refrigerator to chill for at least 2 hours (or ideally overnight).
Step 5: Brûlée Topping
Once the cheesecakes are fully chilled, sprinkle about 1 teaspoon of granulated sugar evenly over each one.
Using a kitchen torch, carefully brûlée the sugar by moving the flame in a circular motion until the sugar melts, bubbles, and turns golden and crisp. Let cool for a few minutes to fully set before serving.
Tips for Success
- Use room temperature cream cheese to prevent lumps
- Don’t overmix the batter to avoid cracking
- Allow enough chill time to set the cheesecakes properly
- If you don’t have a torch, you can place them briefly under a broiler, but watch them very closely
- Wipe your knife clean between cuts if you slice them for sharing
Serving Suggestions
These mini cheesecakes are fabulous on their own, but you could also serve them with:
- Fresh berries
- A drizzle of raspberry or caramel sauce
- A sprinkle of powdered sugar
- A dollop of whipped cream
Storage & Make-Ahead Tips
Store leftover mini cheesecakes in an airtight container in the refrigerator for up to 4 days. If making ahead, brûlée the sugar just before serving to keep the topping crisp.
FAQs
Can I freeze these mini cheesecakes?
Yes! Freeze before brûléeing the top for up to 2 months. Thaw overnight in the fridge, then brûlée the sugar fresh.
Do I need a kitchen torch?
A torch gives the best results, but you can use your oven’s broiler very carefully.
Can I make them gluten-free?
Of course! Just swap the graham cracker crumbs for a gluten-free alternative.
Let’s Stay Connected
If you try these Mini Crème Brûlée Cheesecakes, I’d love to see how they turn out! Share your creations on social media or leave a comment — your kitchen adventures inspire me every day.
The Goods

Mini Crème Brûlée Cheesecakes
We appreciate you taking the time to rate!
Recipes
For the Crust:
- 1 cup graham cracker crumbs use gluten-free if needed
- 3 tablespoons melted butter
- 2 tablespoons granulated sugar
For the Cheesecake Filling:
- 16 oz cream cheese softened
- ½ cup granulated sugar
- 2 large eggs
- 1 teaspoon vanilla extract
- ¼ cup heavy cream
For the Brûlée Topping:
- ¼ cup granulated sugar
Instructions
Step 1: Prep and Preheat
- Preheat your oven to 325°F (163°C). Line a 12-cup muffin tin with cupcake liners — this makes removal and serving much easier.
Step 2: Make the Crust
- In a bowl, combine the graham cracker crumbs, melted butter, and 2 tablespoons of sugar. Mix until the texture resembles wet sand. Press about a tablespoon of this mixture firmly into the bottom of each cupcake liner.
- Bake for 5 minutes, just until set, then set aside to cool slightly.
Step 3: Prepare the Cheesecake Filling
- In a large bowl, beat the softened cream cheese and ½ cup sugar until smooth and creamy. Add the eggs one at a time, beating well after each addition. Mix in the vanilla extract and heavy cream, beating until smooth and silky.
Step 4: Fill and Bake
- Spoon the cheesecake filling evenly over the prepared crusts, filling each liner about three-quarters full.
- Bake for 18–20 minutes, or until the centers are just set but still slightly jiggly. Remove from the oven and let cool to room temperature before transferring to the refrigerator to chill for at least 2 hours (or ideally overnight).
Step 5: Brûlée Topping
- Once the cheesecakes are fully chilled, sprinkle about 1 teaspoon of granulated sugar evenly over each one.
- Using a kitchen torch, carefully brûlée the sugar by moving the flame in a circular motion until the sugar melts, bubbles, and turns golden and crisp. Let cool for a few minutes to fully set before serving.


Leave a Reply